
Choose a Grip You Can Build Your Whole Game Around
Start with neutral shakehand, check exact finger placement, then use a 15-minute-per-grip test to compare stability, comfort and transitions.
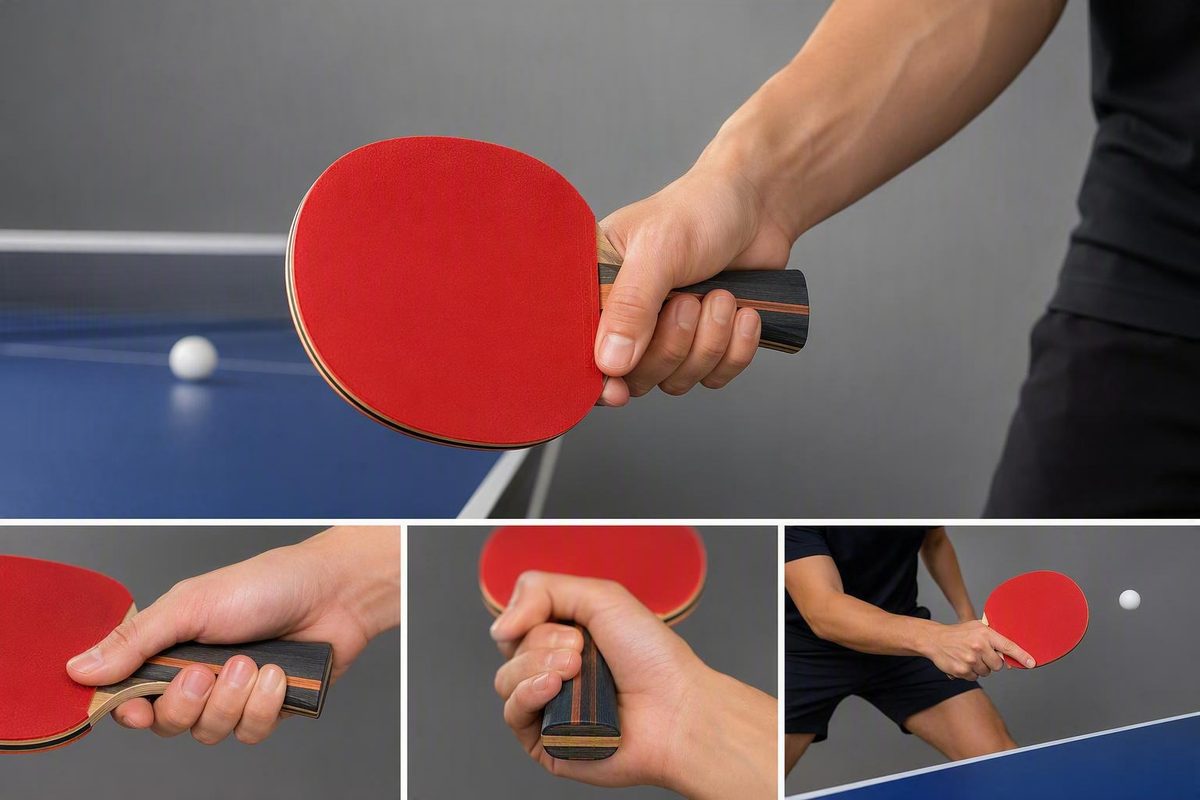
For most new players who want a reliable forehand and backhand, a neutral shakehand grip is a sensible starting point. It offers a straightforward base for two-wing development, but it is not proven to be universally superior. Penhold remains a valid choice, especially when its hand position feels more natural or you are prepared to train its distinct forehand, footwork, and backhand patterns.
Whichever style you choose, prioritize accurate finger placement, repeatable racket angles, and a secure hold without sustained squeezing. Test the grip through forehand, backhand, and transition drills—not just by how comfortable it feels while standing still.
Related: Table Tennis Off-Table Warm-Up Routine.
The quick answer: which grip should you choose?
Shakehand and penhold are the two main table tennis grip families. Shakehand is commonly taught as the more direct route to balanced forehand-backhand play. Traditional penhold is generally more forehand-oriented, while modern penhold can add reverse penhold backhand, or RPB, as a separate attacking option.
These are useful coaching descriptions, not proof that one grip automatically produces more power, spin, touch, wrist freedom, or control.
| Grip | Basic hand position | Likely fit |
|---|---|---|
| Neutral shakehand | Thumb and index finger on opposite faces; three fingers around the handle | Players building a conventional two-wing game |
| Traditional penhold | Thumb and index finger curl around the front; rear fingers support the blade | Players comfortable emphasizing forehand initiative |
| Penhold with RPB | Same penhold foundation, with the reverse face used on backhand strokes | Players who want a more attacking penhold backhand |
| Grip | Main training demand | Backhand approach |
|---|---|---|
| Neutral shakehand | Coordinate both wings and manage the crossover near the playing elbow | Separate forehand and backhand faces |
| Traditional penhold | Develop purposeful footwork and forehand coverage | Conventional backhand uses the forehand racket face |
| Penhold with RPB | Learn reverse-face mechanics and stroke selection | Reverse face provides an attacking backhand option |
Shakehand supports conventional two-wing development, but the area around the playing elbow creates a decision point: move to use the forehand or create room for the backhand. Penhold changes that relationship but brings different movement and stroke-selection demands.
If you have not established your strokes, test both grip families instead of choosing entirely from reputation. That practical approach is also recommended in PingSkills’ comparison of shakehand and penhold.
How to set a neutral shakehand grip
Use this setup before experimenting with a forehand- or backhand-biased position:
- Place the edge of the blade in the V between your thumb and index finger.
- Lay the index finger along the lower part of the backhand rubber, close to its base.
- Rest the thumb on the forehand side near the top of the handle. Do not stretch it high across the rubber.
- Wrap the middle, ring, and little fingers naturally around the handle.
- Slide the hand toward the top of the handle until there is little unnecessary space between the hand and blade.
- Use the crease of the hand aligning approximately with the blade edge as a neutral starting reference.
- Check that the wrist continues naturally from the forearm and that neither racket face requires a major hand rotation.
Hand proportions vary, so crease alignment is a diagnostic reference rather than a millimeter-perfect rule. The objective is a position that allows you to present both racket faces without forcing the hand into an extreme or uncomfortable angle. These placement points match the illustrated neutral shakehand guidance from Expert Table Tennis.
Use the following view checks when inspecting your hand.
Front view: forehand face
- The thumb rests low near the top of the handle.
- The middle, ring, and little fingers wrap around the handle.
- The thumb does not extend far up the rubber.
Back view: backhand face
- The index finger lies along the lower rubber.
- It remains comfortably extended rather than reaching toward the outer edge.
- It helps you sense the racket face without stiffening the hand.
Side view: blade edge
- The V of the hand sits around the blade edge.
- The hand is close to the blade rather than hanging from the bottom of the handle.
- The wrist and forearm form a natural continuation.
A strongly biased shakehand position rotates the hand away from this neutral reference.
A slight personal bias can work, particularly after technique has developed. Beginners should first establish a position from which neither wing requires a large re-grip.
Be cautious with the labels shallow and deep. Instructors use them inconsistently, particularly when describing whether the thumb rests on the handle, blade, or rubber. Describe the actual hand depth and thumb position instead of assuming those labels have universal definitions.
These view checks use a right-handed orientation. Left-handed players should mirror the positioning while keeping each finger’s role unchanged.
How traditional and reverse penhold differ
All penhold variants share a basic foundation: the thumb and index finger curl around the front of the handle while the remaining fingers support the back of the blade. Those rear fingers may be curled, partly extended, or more fully extended according to the variation and the player’s anatomy.
The rear fingers should make the racket angle controllable without causing discomfort or unnecessarily restricting wrist movement. There is no single configuration that every penholder must copy.
Traditional penhold position map
FRONT / FOREHAND FACE          BACK OF BLADE
thumb ↘       ↙ index          middle, ring and little fingers
      [handle]                 support the rear of the blade
      [blade ]
With a conventional traditional penhold backhand, the player generally uses the forehand racket face for both forehand and backhand strokes. The backhand action therefore does not mirror a shakehand backhand.
Reverse penhold backhand position map
FOREHAND                      REVERSE BACKHAND
front face contacts ball      rear face contacts ball
       [blade]                       [blade]

The thumb and index finger retain the penhold foundation.
The racket turns so the opposite face is used on the backhand.
RPB gives penholders a distinct attacking backhand option. It is therefore misleading to say that penhold cannot produce a strong backhand. The useful distinction is between a conventional penhold backhand using the forehand face and a reverse backhand using the opposite face.
Traditional Chinese penhold is commonly shown with the rear fingers more curled. The Japanese/Korean variation is commonly illustrated with more extended rear fingers. These are recognizable patterns rather than rigid templates; instructional examples of the principal grip variations show how the supporting position can differ.
Shakehand versus penhold: what the evidence actually shows
Biomechanical findings should be separated from coaching opinions. Descriptions involving feel, touch, disguise, learning difficulty, wrist use, or ideal playing distance may help players understand the techniques, but they do not establish that one grip inherently delivers better performance.
A 2020 peer-reviewed study compared 27 advanced, right-handed male players: 18 habitual shakehand players and nine habitual penhold players. Participants returned machine-fed topspin and backspin balls with forehand and backhand strokes. The researchers found no statistically significant grip-group difference in forehand racket or ball velocity, despite differences in shoulder and racket motion. On the tested backhand strokes, the shakehand group produced greater racket and ball velocities. The full methods and findings appear in the Journal of Sports Science & Medicine study.
That result supports a cautious observation about the backhands tested—not a declaration that shakehand is the better grip. The research compared different groups using their habitual grips, so grip cannot be separated completely from training history, established technique, or player selection.
The sample was also small and consisted of advanced, right-handed young men performing standardized straight returns. It does not provide a direct basis for extending the results to beginners, women, juniors, left-handed players, recreational players, or tactical match play.
For a beginner, the study is not a reason to reject penhold. It is a reason to avoid unsupported claims that penhold must create a faster forehand or that both grip families impose identical backhand demands.
Grip pressure and stroke-to-stroke adjustments
Hold the racket securely enough that it does not wobble, but do not maintain a hard squeeze that creates unnecessary forearm or wrist tension.
For a beginner using shakehand, learn the basic forehand and backhand with one neutral grip. Keeping the starting position consistent removes a variable from the transition, allowing you to concentrate on foot position, racket angle, timing, and contact.
Experienced players may make small, automatic adjustments between wings. A subtle change in the racket’s angle within the hand is different from a large, conscious re-grip that interrupts timing. If you must look at the hand, release several fingers, or pause to reset before the next stroke, the change is too large for dependable rally play.
The shakehand index finger also supplies feedback about the racket face. That does not make its fingertip a universally established primary pressure point. Coach-answered guidance on grip pressure and thumb drift recommends beginning with one grip while allowing minor adjustments to emerge naturally with experience.
Use this self-check:
- Make 10 slow forehand shadow swings.
- Make 10 slow backhand shadow swings.
- Alternate forehand and backhand for another 20 swings.
- Watch for the thumb creeping upward or the hand rotating toward one wing.
- Check whether the handle fingers release or the racket begins to wobble.
- Notice whether the forearm remains tense after each swing.
- Reset whenever you feel compelled to make a large re-grip.
The objective is not to make the hand completely motionless. It is to remove unnecessary movement so that any later adjustment is small and functional.
Common grip problems and practical fixes
Diagnose the symptom before changing grip families. Many apparent grip problems come from finger placement, sustained pressure, spacing, or stroke choice rather than the basic style itself.
| Symptom | Likely issue | Practical fix |
|---|---|---|
| Forearm remains tense or wrist feels locked | Sustained squeezing | Reduce unnecessary pressure and repeat slow shadow strokes |
| Shakehand index finger is overextended | Finger sits too far across the backhand face | Move it closer to the rubber’s base and retest backhand control |
| Thumb drifts upward during backhands | Hand position changes through repetition | Reset it lower and compare racket-angle repeatability |
| Racket wobbles | Handle fingers provide inconsistent support | Rewrap the three handle fingers before squeezing harder |
| Penhold rear fingers feel rigid | Supporting position restricts the hand | Test a different curl or extension while preserving control |
| Shakehand hesitates near the playing elbow | Late stroke choice, spacing, or footwork may be involved | Train an earlier wing decision with a small foot adjustment |
| Opposite wing requires major hand rotation | Grip is strongly biased | Return toward neutral and rebuild slow transitions |
When the racket wobbles, the instinctive response is often to squeeze harder. First check whether the middle, ring, and little fingers are actually contacting and supporting the handle. Extra pressure is not an efficient substitute for missing support.
For penhold, experiment cautiously with rear-finger placement rather than copying one player’s configuration exactly. Personal accounts about straight or curled fingers cannot establish that either arrangement causes or prevents injury. If a position produces persistent pain or numbness, stop using that position.
Hesitation near the shakehand playing elbow can involve crossover timing, spacing, and footwork decisions. Test those factors before deciding that the grip itself must change. Feed controlled balls around the playing elbow and practise choosing the wing early: adjust your position, create space, and commit to the stroke.
A 15-minute grip test before you commit
This routine takes 15 minutes per grip. Testing both shakehand and penhold therefore takes 30 minutes in total.
- Two minutes: position checks. Inspect the grip from the front, back, and blade edge. Reset every finger carefully.
- Three minutes: shadow strokes. Make slow forehands, backhands, and alternating transitions.
- Two minutes: ball bouncing. Complete two 30-second rounds, using the remaining time to reset and note instability.
- Four minutes: controlled contacts. Play gentle forehands and backhands with a partner, robot, or rebound setup.
- Four minutes: alternating transitions. Switch between wings at controlled speed without trying to hit hard.
After testing each grip, score it from 1 to 5 in these categories:
| Category | What to assess |
|---|---|
| Comfort | Can the hand maintain the position without strain? |
| Racket stability | Does the face wobble during simple contacts? |
| Wrist freedom | Can the wrist move without the grip collapsing? |
| Transition | Can you alternate wings without a major re-grip? |
| Angle repeatability | Can you reproduce the same racket face? |
Beginners should prioritize repeatability and freedom from excess tension over whichever grip produces the hardest first shot. Ball bouncing can expose basic instability, but it does not reproduce forehand-backhand transitions. Do not choose from bouncing alone.
With shakehand, monitor thumb drift and rotation into a strong forehand or backhand bias. With penhold, monitor rear-finger comfort, wrist restriction, and whether you intend to train a conventional backhand, RPB, or both.
This test is a practical selection aid, not a scientific assessment or a guarantee of long-term performance.
Changing an established grip and considering uncommon alternatives
Changing an established grip can temporarily disrupt familiar timing, racket angles, and stroke sensations. Treat the change as a retraining project rather than an experiment to introduce during an important match.
Use a staged progression:
- Establish the static finger position.
- Rehearse isolated shadow strokes.
- Add controlled single-wing drills.
- Introduce forehand-backhand transitions.
- Use the grip in predictable point drills.
- Add it gradually to practice matches and then competition.
Do not impose a fixed conversion timeline. The adjustment depends on how established the old technique is, how large the change is, and how frequently you train.
Uncommon alternatives exist, but novelty is not a reason to switch. The Seemiller grip generally uses the same racket face for ordinary forehand and backhand play and is associated in instructional descriptions with blocking and combination-rubber setups. That association does not establish an advantage for a particular player.
The V-grip places the blade between the index and middle fingers. It is an alternative hand arrangement, not an established shortcut to stronger modern competitive performance.
Unless an uncommon grip solves a specific fit or technique problem, most developing players will gain more from refining shakehand or penhold fundamentals than from repeatedly changing styles.
Frequently asked questions
Do table tennis rules require shakehand or penhold?
Competition legality should be checked against the current official governing-body and event rulebooks, not inferred from an instructional grip guide. The grip descriptions in this article explain technique; they are not a ruling on whether a particular racket setup or method of use complies with every competition’s current requirements.
Does grip tape improve control or only change handle feel?
Grip tape changes the handle’s circumference and surface feel. Sellers promote tapes for traction, moisture management, cushioning, and vibration reduction, but those marketing descriptions do not establish that tape improves playing performance; available products vary in materials and dimensions, as shown in this table tennis handle-tape collection.
Tape may be worth testing when a handle feels too thin or slippery, but it also makes the handle larger. Evaluate the altered racket during controlled forehand-backhand transitions rather than judging it while standing still, and verify current equipment requirements before using it in competition.
Choose the grip that remains comfortable and repeatable through forehand, backhand, and transition drills. Start from a neutral position, correct finger placement and excess tension before changing styles, and record your 15-minute test scores. That makes future adjustments deliberate training decisions rather than reactions to one bad session.